
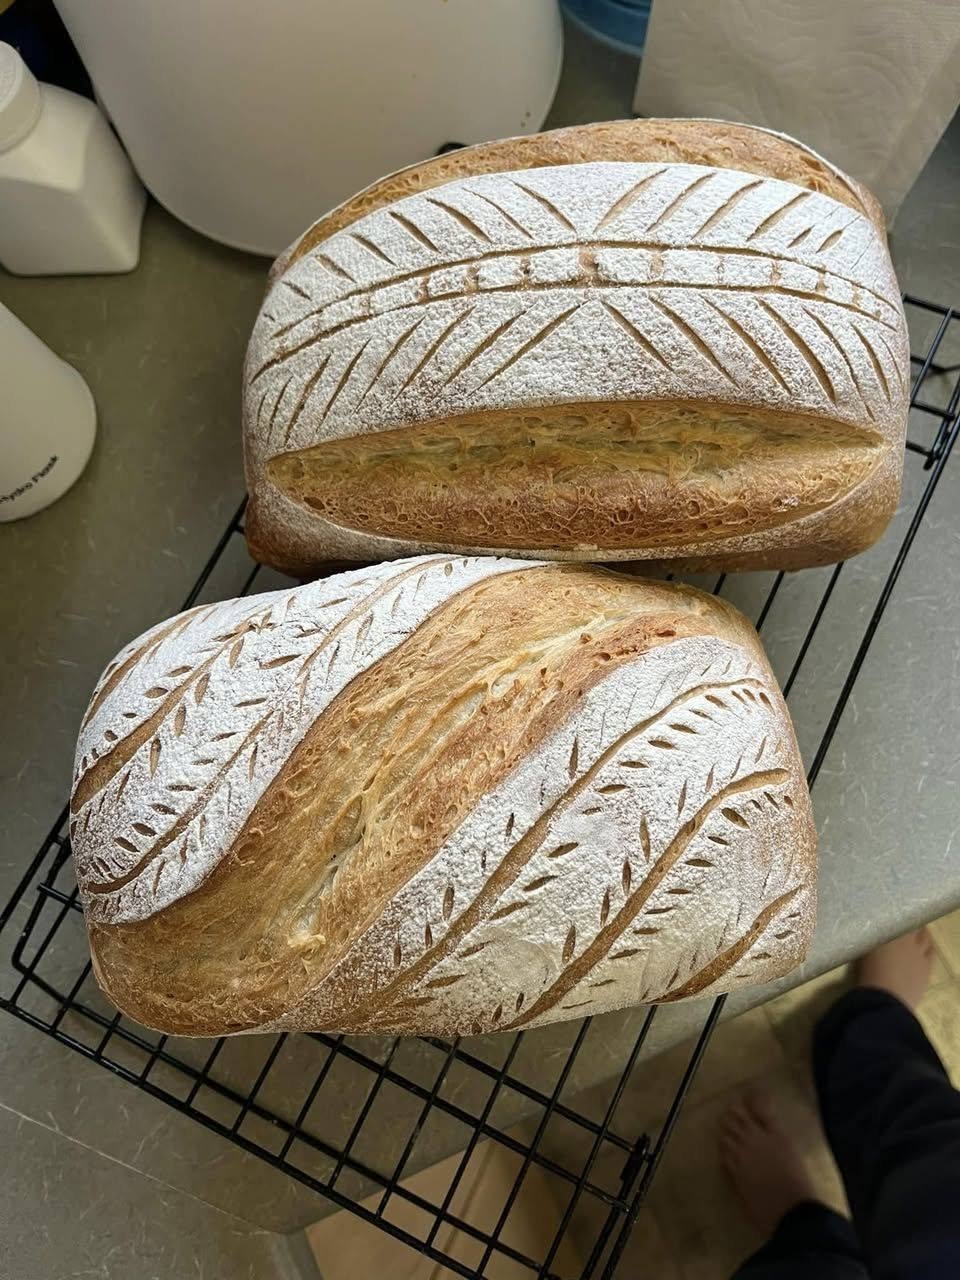
Nothing compares to the aroma of freshly baked sourdough bread filling your kitchen. With its beautifully crisp crust, soft and chewy crumb, and deep tangy flavor, artisan sourdough bread is one of the most rewarding breads you can bake at home. The two loaves shown above feature stunning decorative scoring and a perfect oven spring, making them look just like bread from a professional bakery.
Although sourdough requires patience, the process is surprisingly simple once you understand the basics. Using only flour, water, salt, and an active sourdough starter, you can create incredible bread without commercial yeast. This recipe is ideal for beginners as well as experienced bakers who want consistent results every time.
Why You’ll Love This Recipe
- Crispy, golden crust
- Soft and airy interior
- Naturally fermented for amazing flavor
- No commercial yeast required
- Perfect for sandwiches, toast, or serving with soup
- Beautiful bakery-style scoring
Ingredients
For 2 Artisan Loaves
Dough
- 1000g bread flour
- 750g water (75% hydration)
- 200g active sourdough starter
- 20g fine sea salt
Equipment
- Dutch oven or baking stone
- Mixing bowl
- Kitchen scale
- Banneton baskets
- Bench scraper
- Bread lame or sharp razor
- Cooling rack
Step 1: Feed Your Starter
About 4–6 hours before mixing your dough, feed your sourdough starter.
Your starter is ready when it has:
- Doubled in size
- Looks bubbly
- Floats in water
- Smells pleasantly tangy
Using an active starter is one of the biggest secrets to achieving excellent oven spring.
Step 2: Mix the Dough
In a large bowl combine:
- Water
- Active starter
Mix until the starter dissolves.
Add the bread flour and stir until no dry flour remains.
Cover the bowl and let it rest for 45 minutes.
This resting period is called autolyse, allowing the flour to absorb water and begin gluten development naturally.
Step 3: Add Salt
Sprinkle the salt over the dough.
Wet your hands and gently fold the salt into the dough until fully incorporated.
The dough will become smoother after a few minutes of folding.
Step 4: Bulk Fermentation
Cover the bowl and let the dough ferment for about 4–6 hours depending on room temperature.
During the first two hours perform 4 sets of stretch and folds, every 30 minutes.
To stretch and fold:
- Grab one side of the dough.
- Stretch upward.
- Fold it over the center.
- Rotate the bowl.
- Repeat four times.
Each round strengthens the dough without kneading.
Step 5: Let the Dough Rise
Continue bulk fermentation until the dough:
- Has increased about 50%
- Looks puffy
- Shows bubbles around the edges
- Jiggles slightly when the bowl is shaken
Avoid waiting until it doubles completely, as over-proofing can reduce oven spring.
Step 6: Divide the Dough
Turn the dough onto a lightly floured surface.
Divide it into two equal pieces.
Using a bench scraper, gently shape each into a loose round.
Allow them to rest uncovered for 20–30 minutes.
This bench rest relaxes the gluten and makes final shaping easier.
Step 7: Final Shaping
Shape each loaf tightly by pulling the dough toward yourself while rotating it.
Create strong surface tension without tearing the dough.
Place each loaf seam-side up into a well-floured banneton basket.
Rice flour works especially well because it prevents sticking.
Step 8: Cold Proof
Cover the baskets with plastic or reusable covers.
Refrigerate for 12–18 hours.
Cold proofing develops:
- Better flavor
- Easier scoring
- Crispier crust
- Better oven spring
Step 9: Preheat the Oven
Place your Dutch oven inside the oven.
Preheat to:
250°C (480°F)
Allow at least 45 minutes for the Dutch oven to become fully heated.
Step 10: Score the Dough
Turn one loaf onto parchment paper.
Dust lightly with flour.
Using a bread lame, make one long expansion score.
Add decorative leaf, wheat, or geometric patterns if desired.
Decorative scoring gives your loaf a professional artisan appearance.
Step 11: Bake
Transfer the dough into the hot Dutch oven.
Bake:
- 20 minutes with the lid on
- 20–25 minutes with the lid off
The loaf should become:
- Deep golden brown
- Crispy
- Well-expanded
Internal temperature should reach about 96°C (205°F).
Repeat with the second loaf.
Step 12: Cool
Place the bread on a cooling rack.
Allow it to cool for at least 2 hours before slicing.
Cutting too early can result in a gummy crumb.
Tips for Perfect Sourdough
- Use an active starter.
- Weigh ingredients with a digital scale.
- Don’t rush fermentation.
- Avoid adding excess flour during shaping.
- Practice scoring to achieve beautiful patterns.
- Cold proof overnight for maximum flavor.
Flavor Variations
Try adding:
- Roasted garlic
- Fresh rosemary
- Parmesan cheese
- Jalapeños
- Cheddar
- Kalamata olives
- Sun-dried tomatoes
- Everything bagel seasoning
Storage
Store bread at room temperature in a paper bag or bread box for up to 3 days.
For longer storage:
- Slice the loaf.
- Freeze in an airtight bag for up to 3 months.
- Toast slices directly from frozen.
Serving Ideas
This artisan sourdough pairs perfectly with:
- Butter and sea salt
- Homemade soups
- Beef stew
- Avocado toast
- Grilled cheese sandwiches
- Bruschetta
- Olive oil and balsamic vinegar
- Breakfast eggs
Frequently Asked Questions
Why didn’t my bread rise?
Your starter may not have been active enough, or the dough may have been under-proofed.
Can I use all-purpose flour?
Yes, but bread flour produces better gluten development and oven spring.
Why is my crust too soft?
Bake a little longer with the lid off and allow the bread to cool completely before storing.
Do I need a Dutch oven?
A Dutch oven gives the best results, but you can also bake on a baking stone with added steam.
Can I refrigerate the dough longer?
Yes. Many bakers proof their dough for up to 24 hours for an even deeper sourdough flavor.
Final Thoughts
Baking artisan sourdough bread is a rewarding process that combines simple ingredients with time and technique to create something truly special. The crackling crust, open crumb, and rich, naturally fermented flavor make every slice worth the effort. Whether you’re serving it warm with butter, using it for hearty sandwiches, or pairing it with your favorite soup, this homemade sourdough is sure to become a staple in your kitchen. With a little practice, you’ll be creating bakery-quality loaves with beautiful scoring and exceptional taste every time.
