
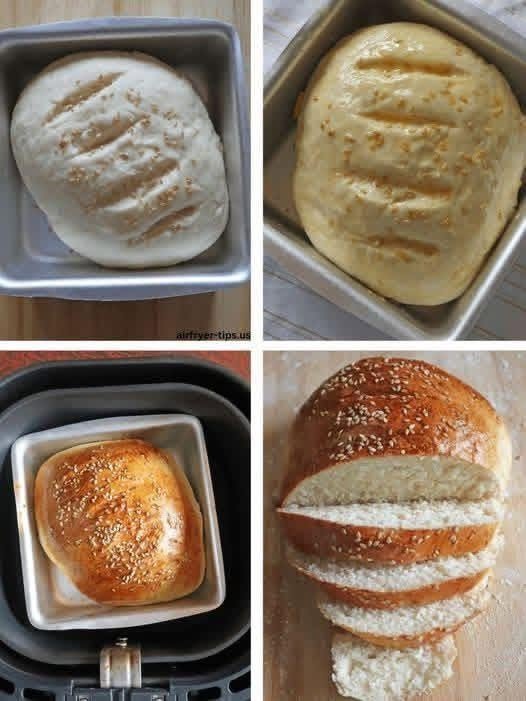
This easy homemade sandwich bread is soft, fluffy, golden on the outside, and wonderfully tender inside. It’s a simple recipe for anyone who wants fresh bakery-style bread at home without complicated techniques or special equipment. The beautiful loaf in the photo has a soft crumb, a lightly crisp golden crust, and a delicious sesame topping that makes every slice look irresistible.
Whether you want bread for sandwiches, toast, breakfast, or simply spreading with butter, this recipe is a great everyday option. The dough is easy to prepare, and you can bake the loaf in a regular loaf pan or even adapt it for a small baking pan or air fryer, depending on the equipment you have.
🥖 Why You’ll Love This Homemade Bread
There is something special about homemade bread. The smell fills the kitchen while it bakes, and the texture is much fresher than packaged bread.
This recipe creates a loaf that is:
- Soft and fluffy inside
- Golden and slightly crisp outside
- Perfect for sandwiches
- Delicious toasted with butter
- Easy enough for beginners
- Made with simple pantry ingredients
- Great for breakfast or lunch
- Perfect for adding sesame seeds or other toppings
The secret to getting a soft loaf is giving the dough enough time to develop and rise. Proper kneading also helps create the gluten structure needed for that beautiful airy texture.
🧂 Ingredients
For the Dough
- 3 cups all-purpose flour or bread flour
- 1 cup warm milk
- 2 tablespoons sugar
- 2 teaspoons instant yeast
- 1 teaspoon salt
- 2 tablespoons melted butter
- 1 large egg
- 2 tablespoons vegetable oil
For the Topping
- 1 tablespoon milk or beaten egg
- 1–2 tablespoons sesame seeds
You can also use a mixture of sesame seeds, sunflower seeds, or poppy seeds if you prefer.
👩🍳 How to Make Homemade Sandwich Bread
Step 1: Prepare the Yeast
Start by adding the warm milk to a large mixing bowl. The milk should be warm but not extremely hot. Add the sugar and instant yeast and gently mix.
Let it sit for about 5–10 minutes if you’re using active dry yeast. You may notice a light layer of foam forming on top. This indicates that the yeast is becoming active.
If you’re using instant yeast, you can also mix it directly with the flour.
Step 2: Make the Dough
Add the egg, melted butter, and vegetable oil to the milk mixture.
Mix everything together, then gradually add the flour and salt.
Start mixing with a spoon or spatula until a rough dough forms. The dough may look slightly sticky at this stage, which is completely normal.
Avoid adding too much flour. Adding excessive flour can make the finished bread heavy and dry.
Step 3: Knead the Dough
Transfer the dough onto a lightly floured surface and knead for approximately 8–10 minutes.
You can also use a stand mixer with a dough hook.
The dough should become smoother, softer, and elastic as you knead it. A useful test is the windowpane test. Take a small piece of dough and gently stretch it between your fingers. If it stretches thinly without immediately tearing, the gluten has developed well.
Place the dough into a lightly greased bowl and cover it with plastic wrap or a clean kitchen towel.
Step 4: First Rise
Leave the dough in a warm place for approximately 1–1½ hours, or until it has doubled in size.
The exact time depends on the temperature of your kitchen. In a warm environment, the dough may rise faster, while a cooler kitchen can take longer.
Don’t rely only on the clock. Look at the dough—it should become noticeably larger and airy.
Step 5: Shape the Loaf
Once the dough has doubled, gently press it down to release excess air.
Transfer it to your work surface and shape it into a smooth loaf.
Roll the dough into a rectangle, then gently roll it up into a log. Pinch the seam closed and place the loaf seam-side down into a greased loaf pan.
Make sure the pan isn’t too large for the amount of dough. A properly sized pan helps the bread rise upward and creates a beautiful loaf shape.
Step 6: Second Rise
Cover the pan and allow the dough to rise again for approximately 30–60 minutes.
The dough should become puffy and rise noticeably above its original size.
Don’t let it overproof. If the dough becomes extremely swollen and starts collapsing, it may have fermented too long.
Step 7: Add the Topping
Once the dough has finished its second rise, gently brush the surface with milk or beaten egg.
Sprinkle sesame seeds generously over the top.
For the attractive appearance shown in the photo, you can also make several shallow diagonal cuts across the surface using a sharp knife or bread lame.
Be careful not to cut too deeply because you don’t want to deflate the dough.
Step 8: Bake
Preheat your oven to 350°F (175°C).
Place the loaf in the preheated oven and bake for approximately 25–35 minutes, depending on the size and shape of your loaf.
The bread should become beautifully golden brown on top.
If the top starts browning too quickly, loosely cover it with aluminum foil during the final part of baking.
The bread is ready when it sounds hollow when lightly tapped on the bottom and has a deep golden color.
🧈 The Most Important Step: Cooling
Once the bread comes out of the oven, allow it to cool in the pan for about 5–10 minutes.
Then carefully remove it from the pan and place it on a wire rack.
For an extra-soft crust, lightly brush the hot loaf with melted butter.
Try to resist cutting the bread immediately. I know the smell of fresh bread makes that difficult, but allowing it to cool helps the crumb finish setting.
Cutting it while it’s extremely hot can cause the inside to become gummy or compressed.
🔪 How to Get Beautiful Slices
For clean, bakery-style slices, use a sharp serrated bread knife.
Allow the loaf to cool completely before slicing. Use a gentle sawing motion rather than pressing straight down.
You can make thin slices for sandwiches or thicker slices for toast.
The finished bread should have a soft, fluffy interior with an even crumb and a golden crust.
🥪 Ways to Serve This Bread
This homemade loaf is incredibly versatile.
Use it to make:
- Turkey and cheese sandwiches
- Chicken sandwiches
- Egg sandwiches
- Grilled cheese
- Peanut butter and jelly
- Avocado toast
- Garlic toast
- French toast
- Breakfast sandwiches
It is also delicious simply toasted and spread with butter, honey, or homemade jam.
❄️ How to Store Homemade Bread
Once completely cooled, store the bread in an airtight container or bread bag at room temperature.
It should stay soft for several days.
For longer storage, slice the loaf and freeze the slices in a freezer-safe bag. Place parchment paper between slices if you want to remove individual pieces easily.
When you need bread, simply take out the required slices and let them thaw naturally or toast them directly from frozen.
💡 Tips for Perfect Homemade Bread
Use the correct flour: Bread flour can produce a slightly chewier and more structured loaf, while all-purpose flour creates a soft everyday bread.
Don’t add too much flour: Slightly sticky dough can become beautifully soft bread. Too much flour usually results in a dense loaf.
Knead properly: Good gluten development is essential for a fluffy texture.
Give the dough enough time to rise: Rising time depends on room temperature, so watch the dough rather than following the clock blindly.
Don’t skip the second rise: This helps create a lighter and softer loaf.
Preheat your oven: Putting the bread into a cold oven can affect its rise and final texture.
Cool before slicing: This gives the interior time to set properly.
🍞 Final Thoughts
Making homemade sandwich bread doesn’t have to be difficult. With a few simple ingredients, some patience, and proper kneading and proofing, you can create a beautiful golden loaf right in your own kitchen.
The combination of a soft, fluffy center, golden crust, and crunchy sesame topping makes this bread perfect for everyday meals. Once you try homemade bread like this, you may find yourself making it regularly instead of buying packaged loaves.
Serve it fresh with butter, turn it into sandwiches for lunch, or toast a few slices for a comforting breakfast. This easy homemade sandwich bread is simple, delicious, and worth making from scratch
