
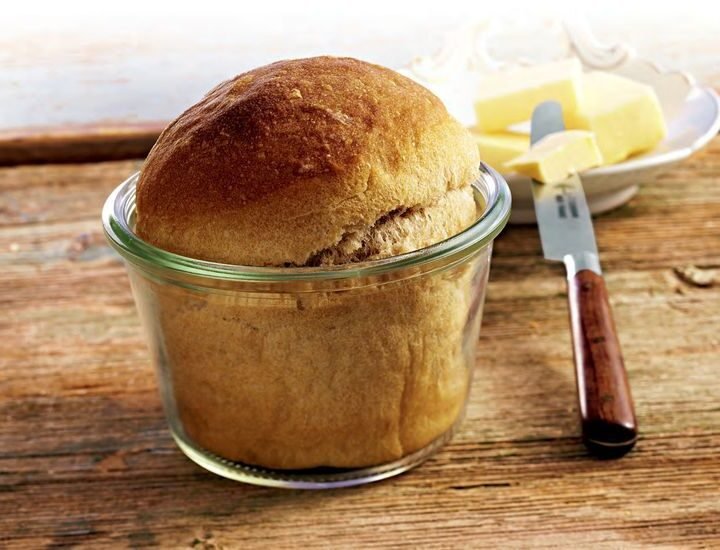
Sourdough Bread in a Jar Recipe
There is something special about baking homemade bread in a jar. It creates a beautiful rustic presentation while giving you perfectly sized mini loaves that are easy to serve, share, or gift. This Sourdough Bread in a Jar has a soft, fluffy center, a lightly golden crust, and the pleasant tangy flavor that comes from a naturally fermented sourdough starter.
Baking the dough in wide-mouth glass jars also makes each loaf look unique. These little breads are perfect for breakfast, afternoon snacks, homemade gifts, or serving alongside soups and stews. You can enjoy them warm with butter and honey or slice them for small sandwiches.
Why You’ll Love This Recipe
- Made with active sourdough starter for natural flavor.
- Soft and fluffy with a mild sourdough tang.
- Creates adorable individual mini loaves.
- Great for gifting and special occasions.
- Easy to customize with herbs, cheese, spices, or dried fruit.
- Delicious fresh from the oven or toasted later.
Ingredients
Makes 4 pint-sized mini loaves
For the Dough
- 1 cup active sourdough starter, 100% hydration
- 1 cup warm water
- 2 tablespoons honey
- 2 tablespoons melted butter
- 3 cups bread flour
- 1 teaspoon salt
Optional Add-Ins
For a flavored version, you can add:
- 1 tablespoon dried rosemary
- ½ cup shredded cheddar cheese
- ¼ cup dried cranberries
- 1 teaspoon garlic powder
You can use one add-in or combine a few to create your favorite flavor.
Equipment
- 4 wide-mouth pint-size mason jars
- Large mixing bowl
- Dough scraper
- Kitchen towel or plastic wrap
- Baking sheet
- Wire cooling rack
- Oven mitts
Instructions
1. Prepare the Dough
Add the active sourdough starter, warm water, honey, and melted butter to a large mixing bowl. Stir well until everything is evenly combined.
Add the bread flour and salt. Mix with a wooden spoon or your hands until a rough, shaggy dough forms.
Knead the dough by hand for about 8 to 10 minutes. If using a stand mixer, knead with the dough hook for about 5 to 6 minutes.
The finished dough should feel soft and smooth with a slight tackiness. It should not be extremely sticky. If the dough feels too wet, add flour one tablespoon at a time until it becomes easier to handle.
If you are using rosemary, garlic powder, cheese, or dried cranberries, gently work them into the dough during the final few minutes of kneading.
2. Let the Dough Rise
Place the dough into a lightly greased bowl. Cover it with a clean kitchen towel or plastic wrap.
Leave the dough at room temperature for approximately 4 to 6 hours. The exact time will depend on the strength of your sourdough starter and the temperature of your kitchen.
The dough should become noticeably larger and should nearly double in size.
For a deeper sourdough flavor, you can place the dough in the refrigerator after the first rise and let it rest overnight.
3. Prepare the Jars
Wash the wide-mouth mason jars thoroughly and make sure they are completely dry.
Lightly grease the inside of each jar with butter or nonstick cooking spray. Coat the bottom and sides well to make removing the bread easier after baking.
Use jars that are suitable for oven baking. Avoid jars that are not designed to handle oven temperatures, as sudden temperature changes can cause glass to break.
4. Divide and Shape the Dough
Transfer the risen dough onto a lightly floured work surface.
Divide the dough into four equal portions.
Take one portion and gently shape it into a smooth ball. Pull the outer edges toward the center and pinch the seams underneath.
Repeat with the remaining pieces of dough.
Place one shaped dough ball into each prepared jar. The dough should fill only about one-third to one-half of the jar because it will expand during the second rise and baking.
5. Second Rise
Place the filled jars on a baking sheet and cover them loosely with a clean kitchen towel.
Allow the dough to rise for about 1 to 2 hours.
The dough should become puffy and expand until it reaches roughly 1 inch below the rim of the jar.
Do not allow the dough to rise too far above the rim before baking. It will continue to expand in the oven and may overflow.
6. Bake the Bread
Preheat your oven to 375°F (190°C).
Once the oven is fully heated, place the baking sheet with the jars inside.
Bake for approximately 25 to 30 minutes, or until the tops become golden brown.
The bread should sound hollow when gently tapped. For the most reliable result, check the center with an instant-read thermometer. The internal temperature should be around 200°F (93°C).
If the tops begin browning too quickly, loosely cover them with foil during the final part of baking.
7. Cool the Mini Loaves
Carefully remove the baking sheet from the oven using oven mitts. The jars will be extremely hot.
Allow the bread to cool in the jars for about 10 minutes.
Run a thin knife around the edges if needed, then gently loosen the bread from the jars.
You can remove the mini loaves completely and finish cooling them on a wire rack, or leave them inside the jars for a charming homemade presentation.
Let the bread cool before slicing so the inside has time to finish setting.
Serving Suggestions
There are many ways to enjoy these mini sourdough loaves.
Serve them warm with:
- Butter and honey
- Homemade jam
- Cream cheese
- Fresh fruit preserves
- Olive oil and balsamic vinegar
- Soup or stew
You can also slice the mini loaves and use them to make small sandwiches. Their individual size makes them especially convenient for breakfast or lunch.
For a simple breakfast, toast a few slices and top them with cream cheese and fruit preserves. You can also add butter and a drizzle of honey for a sweet and comforting snack.
Flavor Variations
One of the best things about this recipe is how easy it is to customize.
For a savory loaf, mix in rosemary and shredded cheddar cheese. Garlic powder can also add a delicious savory flavor.
For something slightly sweet, add dried cranberries and a little extra honey.
You can also experiment with other herbs, seeds, or dried fruit. Keep the amount of additional ingredients moderate so they do not interfere with the dough’s ability to rise.
Storage
Allow the bread to cool completely before storing it.
Store the mini loaves in an airtight container or sealed food bag at room temperature for up to 3 days.
For longer storage, wrap each loaf tightly and freeze for up to 2 months.
When ready to eat, thaw the bread at room temperature. You can warm it briefly in the oven or toast slices for a fresh texture.
If you plan to keep the bread inside the jars, make sure the jars and bread are completely cool before adding lids. Do not seal hot bread in the jars because trapped moisture can make the bread soggy.
Tips for Success
- Use an active, bubbly sourdough starter for the best rise.
- Give the dough enough time to ferment because sourdough develops more slowly than commercial yeast bread.
- Use wide-mouth jars so the baked bread can be removed easily.
- Grease the jars thoroughly before adding the dough.
- Do not fill the jars more than halfway with dough.
- Keep an eye on the second rise because fermentation time varies with room temperature.
- Always use oven-safe jars designed for baking.
- Place the jars on a baking sheet for easier and safer handling.
- Let the bread cool before slicing.
- Try herbs, cheese, garlic, or dried fruit for different flavors.
Final Thoughts
Sourdough Bread in a Jar is a fun way to turn a traditional loaf into something more personal and creative. The individual portions are convenient for serving, and the jars give the bread a beautiful rustic appearance.
Whether you make plain sourdough mini loaves or add rosemary, cheddar, garlic, or dried cranberries, these little breads are perfect for breakfast, snacks, gifts, and family meals. With an active starter and a little patience, you can make soft, flavorful homemade bread right in your own kitchen.
