
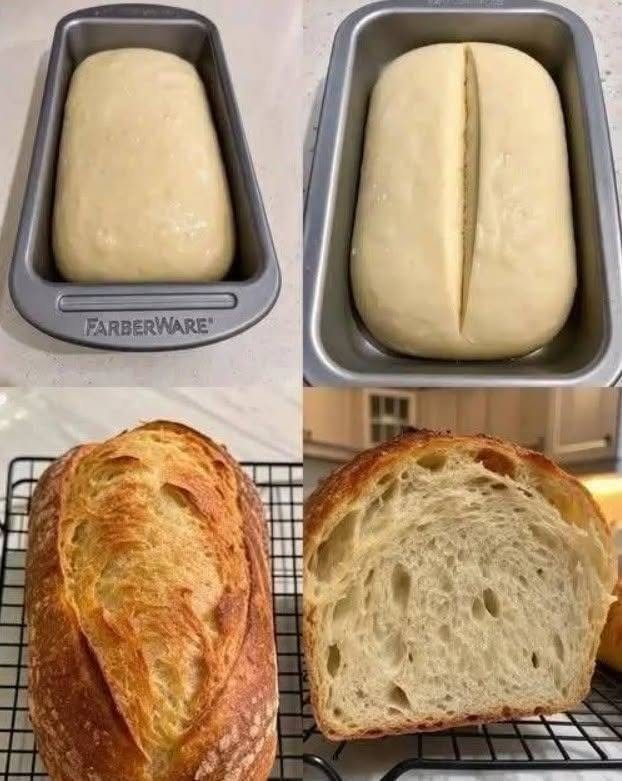
There is something incredibly satisfying about baking a beautiful homemade sourdough loaf from scratch. This classic sourdough sandwich bread is simple, rustic, and full of natural sourdough flavor. It has a golden, crisp crust on the outside and a soft, airy crumb on the inside, making it perfect for sandwiches, toast, breakfast, or simply enjoying with butter.
The loaf in the picture is baked in a loaf pan, which helps create its beautiful tall shape. A long score down the center allows the dough to expand during baking and gives the finished loaf that attractive bakery-style appearance.
This recipe uses a simple combination of flour, water, active sourdough starter, and salt. Similar traditional sourdough sandwich-loaf formulas use roughly 500 g flour, 350 g water, active starter, and salt, with fermentation and proofing times adjusted according to room temperature and starter activity. (The simplest way to make sourdough)
Why You’ll Love This Sourdough Bread
This loaf is a great everyday sourdough recipe because it doesn’t require complicated ingredients. The long fermentation gives the bread its characteristic flavor while allowing the dough to develop strength naturally.
The inside should have a light, tender texture with small-to-medium irregular holes. The crust becomes beautifully golden brown and slightly crisp after baking. Once completely cooled, the loaf slices neatly and can be used for sandwiches, French toast, grilled cheese, or simple toast with butter and jam.
The most important thing to remember with sourdough is that the dough—not the clock—should determine fermentation. Temperature, starter strength, flour, and hydration can all change how quickly your dough rises.
Classic Sourdough Sandwich Bread
Prep Time
30 minutes
Fermentation & Proofing
8–12 hours, depending on temperature
Bake Time
40–50 minutes
Total Time
Approximately 12–16 hours
Yield
1 large loaf
Ingredients
- 500 g strong bread flour
- 350 g water, preferably filtered
- 50 g active sourdough starter
- 7–10 g fine sea salt
- A little flour for shaping
- A little oil or butter for greasing the loaf pan
For the best results, use a strong, active sourdough starter that is bubbly and has risen noticeably after feeding. A healthy starter provides the natural leavening needed to make the bread rise.
Step 1: Prepare Your Sourdough Starter
Before making the dough, make sure your starter is active. Ideally, feed your starter several hours before beginning the recipe and wait until it becomes bubbly, airy, and active.
A starter that has recently peaked will generally give you better fermentation than a starter that has been sitting inactive for a long time.
You can perform a simple visual check: the starter should look lively, with bubbles throughout and an expanded appearance.
Step 2: Mix the Dough
Add 350 g of water to a large mixing bowl.
Add 50 g of active sourdough starter and mix until the starter is mostly dispersed through the water.
Next, add 500 g of bread flour. Mix everything together using your hands, a dough whisk, or a sturdy spoon until there are no large areas of dry flour remaining.
The dough will look rough and sticky at this stage. That’s completely normal.
Cover the bowl and let the dough rest for approximately 30 minutes. This short rest gives the flour time to absorb the water and allows the dough to begin developing gluten.
Step 3: Add the Salt
After the initial rest, sprinkle 7–10 g of salt over the dough.
Wet your hands slightly and squeeze, fold, and mix the dough until the salt is evenly incorporated.
You don’t need to knead aggressively. Sourdough develops strength gradually through fermentation and folding.
Step 4: Stretch and Fold
Cover the bowl and let the dough rest.
During the first couple of hours of bulk fermentation, perform several sets of stretch-and-folds.
To do one fold, grab one side of the dough, gently stretch it upward, and fold it over the center. Turn the bowl and repeat from another side.
Complete approximately 3–4 sets, leaving about 30 minutes between each set.
As you continue folding, you’ll notice that the dough changes from rough and sticky to smoother, stronger, and more elastic.
This folding process helps develop the gluten network that will eventually hold the gases produced during fermentation.
Step 5: Bulk Fermentation
After the folds are complete, cover the bowl and allow the dough to continue fermenting at room temperature.
The exact timing will depend heavily on your kitchen temperature and starter strength.
Instead of waiting for an exact number of hours, watch the dough.
You want it to become:
- Noticeably larger
- Airy and slightly puffy
- Smooth and elastic
- Full of some visible bubbles
- Slightly jiggly when the bowl is moved
For many sourdough recipes, fermentation may take several hours, but the timing can vary considerably with temperature. (centralmilling.com)
Avoid automatically waiting for the dough to double if your dough is already showing strong fermentation. Over-fermented dough can become difficult to shape and may lose its ability to hold a tall loaf.
Step 6: Shape the Loaf
Lightly flour your work surface and gently turn the fermented dough out of the bowl.
Try not to completely flatten the dough because you want to preserve some of the air that has developed during fermentation.
Gently stretch the dough into a rough rectangle.
Fold the sides toward the center, then begin rolling the dough tightly from one end to the other.
As you roll, create gentle tension on the surface of the dough. This helps the loaf maintain its structure while proofing and baking.
Pinch or seal the seam underneath.
Lightly grease a loaf pan and place the shaped dough inside seam-side down.
A standard loaf pan works well for this recipe.
Step 7: Final Proof
Cover the loaf pan with a clean towel, reusable cover, or plastic wrap.
Allow the dough to proof at room temperature.
The loaf should gradually become puffy and rise noticeably in the pan.
Depending on your starter and room temperature, this can take several hours. Some bakers also use an overnight refrigerator proof to develop additional flavor and make the dough easier to handle.
The loaf is ready when it looks airy and expanded rather than dense and compact.
A gentle finger press should leave an indentation that slowly begins to recover.
Step 8: Score the Dough
Once the loaf has finished proofing, it’s time to score it.
Using a very sharp knife, bread lame, or razor blade, make one long cut down the center of the loaf.
The score gives the bread a controlled place to expand in the oven. A long central score is also what creates the attractive opening seen on the loaf in the picture.
Make the cut confidently rather than repeatedly dragging the blade through the dough.
Step 9: Bake
Preheat your oven thoroughly before baking.
A temperature around 400–425°F (200–220°C) works well for many sourdough pan loaves, although exact baking temperature and time can vary between ovens and recipes. (King Arthur Baking)
Place the loaf pan in the center of the preheated oven.
Bake until the bread develops a deep golden-brown crust and feels firm.
Depending on your oven and loaf size, expect approximately 40–50 minutes of baking time.
If you use an instant-read thermometer, the center of a fully baked sourdough loaf is generally around 200–205°F (93–96°C). (King Arthur Baking)
The crust should be golden brown, and the loaf should look well risen and fully set.
Step 10: Cool Completely
Remove the bread from the pan as soon as it comes out of the oven and place it on a wire rack.
This step is extremely important.
Although it may be tempting to slice into the hot bread immediately, allow the loaf to cool completely first. The interior continues setting as the bread cools. Cutting too early can result in a gummy or compressed crumb. (Eat Cottage)
For the best texture, wait at least one hour before slicing.
Use a serrated bread knife and cut with long, gentle strokes.
Tips for Perfect Sourdough Sandwich Bread
1. Use an active starter
Your starter is responsible for the rise, so make sure it is bubbly and active before mixing your dough.
2. Don’t rely only on the clock
Fermentation changes with temperature. A dough that takes six hours in one kitchen might take considerably longer or shorter in another.
3. Don’t add too much flour while shaping
Extra flour can make the finished bread heavier and drier. Use just enough to prevent sticking.
4. Build good surface tension
When shaping the loaf, roll it firmly enough to create tension without completely crushing the dough.
5. Give it enough proofing time
Under-proofed dough can produce a dense loaf with limited expansion. Look for a puffy, airy dough rather than following a fixed time.
6. Cool before slicing
This is one of the easiest ways to improve your sourdough texture.
How to Serve Sourdough Sandwich Bread
This homemade loaf is incredibly versatile. Toast a slice and spread it with butter and honey for breakfast. Use two slices for a classic grilled cheese sandwich, or make a fresh chicken, egg, tuna, or vegetable sandwich.
It also makes excellent French toast because the sourdough flavor adds extra depth.
You can even slice the loaf, freeze the slices, and toast them directly from frozen whenever you need fresh bread.
Final Thoughts
This classic sourdough sandwich loaf is a wonderful recipe for anyone who wants homemade bread with a beautiful bakery-style appearance and naturally fermented flavor. The process is simple, but the results are impressive: a golden crust, soft interior, beautiful scoring, and an airy crumb.
The key is patience. Give your starter time to become active, allow the dough to ferment properly, shape it gently but firmly, and let the finished bread cool completely before slicing.
Once you get comfortable with this basic loaf, you can experiment with whole-wheat flour, seeds, herbs, cheese, roasted garlic, or other additions. But even in its simplest form, this classic sourdough bread is delicious enough to become an everyday favorite.
Enjoy your homemade sourdough! 🍞✨
