
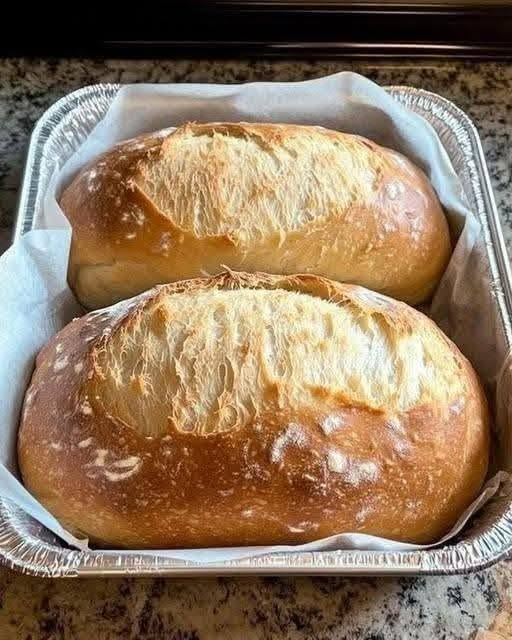
There is something incredibly satisfying about baking a beautiful loaf of homemade sourdough bread. With its golden-brown crust, soft airy center, and rustic appearance, this classic sourdough is perfect for everyday sandwiches, breakfast toast, or simply enjoying warm with butter. The loaves in the picture have a beautiful golden crust with a naturally open, fluffy texture, making them a wonderful inspiration for a traditional homemade sourdough recipe.
This recipe makes two medium-sized sourdough loaves using a simple combination of active sourdough starter, bread flour, water, and salt. The dough is mixed gently, strengthened through several folds, allowed to ferment naturally, then shaped and baked until deeply golden.
Ingredients
For the Dough
- 200g active sourdough starter
- 700g warm water
- 1,000g bread flour
- 20g fine sea salt
- Extra rice flour or bread flour for dusting
- A little olive oil or flour for handling, if needed
For the best results, use a sourdough starter that is active, bubbly, and has recently been fed. Your starter should ideally double in size within several hours after feeding.
Equipment
- Large mixing bowl
- Dough scraper
- Kitchen scale
- Two proofing baskets or bowls lined with clean towels
- Parchment paper
- Dutch ovens or heavy baking dishes with lids
- Lame or very sharp knife
- Cooling rack
Step 1: Prepare the Dough
Begin by adding the active sourdough starter to a large mixing bowl. Pour in approximately 650g of the water and mix until the starter is mostly dissolved.
Add the bread flour and mix with your hands or a dough whisk until no large patches of dry flour remain. The dough will look rough and shaggy at this stage, which is completely normal.
Cover the bowl and allow the dough to rest for about 30–45 minutes. This resting period, often called an autolyse or fermentolyse, gives the flour time to absorb the water and helps develop gluten naturally.
After resting, dissolve the salt in the remaining 50g of water. Pour it over the dough and gently squeeze and fold the mixture with your hands until the salt water is fully incorporated.
Step 2: Bulk Fermentation
Cover the bowl and let the dough begin its first fermentation at room temperature.
For the first two hours, perform a series of stretch-and-folds or coil folds every 30 minutes.
To perform a stretch-and-fold, wet your hand, grab one side of the dough, gently stretch it upward, and fold it over the center. Rotate the bowl and repeat on all four sides.
You can perform about 4–6 sets of folds.
As fermentation continues, the dough will gradually become smoother, stronger, and more elastic. You should notice bubbles developing throughout the dough.
The total bulk fermentation time can vary considerably depending on the temperature of your kitchen and the strength of your starter. Instead of relying only on the clock, look for the dough to increase in volume by approximately 50–75%, become noticeably airy, and have bubbles around the edges.
Step 3: Divide and Pre-Shape
Lightly flour your work surface and carefully turn the dough onto it.
Using a dough scraper, divide the dough into two equal portions. Try not to aggressively press the air out of the dough because those fermentation bubbles will help create the beautiful texture inside the finished bread.
Gently pre-shape each portion into a loose round. Let the dough rest uncovered for about 15–25 minutes.
This short bench rest allows the gluten to relax and makes final shaping easier.
Step 4: Shape the Loaves
Lightly flour the tops of the dough portions and flip one piece over.
Fold the bottom portion toward the center, then fold the sides inward. Finally, roll or fold the dough toward the top to create a tight loaf.
Gently drag the dough across the work surface to create surface tension.
Repeat with the second portion.
Place each shaped loaf seam-side up into a well-floured proofing basket. If you do not have bannetons, use bowls lined with clean kitchen towels and generously dusted with flour.
Step 5: Final Proof
Cover the baskets with plastic wrap, reusable covers, or clean towels.
You can allow the loaves to proof at room temperature for several hours, depending on your dough and kitchen temperature.
For a more developed flavor and easier scoring, place the shaped loaves in the refrigerator for an overnight cold proof of approximately 8–16 hours.
Cold fermentation gives sourdough its characteristic flavor and also makes the dough much easier to handle before baking.
Step 6: Prepare for Baking
When you’re ready to bake, preheat your Dutch oven to 450°F (230°C) for at least 30–45 minutes.
Take one loaf directly from the refrigerator and place it onto a piece of parchment paper.
Turn the loaf over so the smooth side is facing upward.
Using a sharp bread lame or knife, score the surface with one long slash or your favorite decorative pattern. Scoring gives the bread a controlled place to expand in the oven.
The beautiful split along the top of the loaves in the picture comes from proper scoring combined with strong fermentation and high oven heat.
Step 7: Bake the Sourdough
Carefully place the scored loaf into the preheated Dutch oven.
Cover with the lid and bake for 25–30 minutes. The steam trapped inside the Dutch oven helps the loaf rise dramatically and creates a thin, crisp crust.
Remove the lid and continue baking for another 15–20 minutes, or until the bread is a deep golden brown.
If you prefer a darker, crunchier crust, allow it to bake for a few additional minutes while keeping a close eye on it.
Repeat the process with the second loaf.
Step 8: Cool Completely
This step is important!
Place the finished sourdough on a wire rack and allow it to cool for at least 1–2 hours before slicing.
Although it can be tempting to cut into a hot loaf immediately, the inside is still finishing its baking process as it cools. Cutting too early can result in a gummy or slightly wet crumb.
Once completely cool, use a serrated bread knife to slice the loaf.
Tips for Perfect Sourdough
Use an active starter: Your starter should be bubbly and energetic before making the dough. A weak starter can result in a dense loaf.
Watch the dough, not just the clock: Fermentation depends on room temperature, starter strength, flour, and hydration. Learn to recognize visual signs of fermentation.
Don’t add too much flour: Sourdough dough can feel sticky at first. Instead of adding lots of flour, use wet hands and a dough scraper.
Build gluten gradually: Stretch-and-folds or coil folds help strengthen the dough without intensive kneading.
Don’t skip the preheat: A properly heated Dutch oven provides the intense heat and steam necessary for excellent oven spring.
Let the bread cool: Patience gives you a better crumb and makes slicing much easier.
How to Store Homemade Sourdough
Store the cooled loaf at room temperature in a bread bag, paper bag, or wrapped kitchen towel for up to several days. Avoid storing freshly baked sourdough in the refrigerator because the cold temperature can make the bread stale more quickly.
For longer storage, slice the bread and freeze it in an airtight freezer bag. Individual slices can be removed whenever needed and toasted directly from frozen.
Serving Ideas
Fresh sourdough is delicious in countless ways. Serve thick slices with butter and honey for breakfast, make crispy avocado toast, use it for grilled cheese sandwiches, or serve it alongside soups and stews.
You can also toast leftover slices with garlic butter, turn them into homemade croutons, or use them for French toast.
Final Thoughts
This homemade artisan sourdough recipe produces two beautiful golden loaves with a crisp crust and soft, flavorful interior. The process takes time, but most of that time is hands-off fermentation, making sourdough a rewarding recipe for both beginners and experienced bakers.
Once you become comfortable with the basic method, you can experiment with different flours, seeds, herbs, roasted garlic, cheese, dried fruit, or nuts. The key is to focus on your starter, fermentation, dough strength, and baking temperature.
With a little practice, you’ll be able to create bakery-style sourdough bread at home with a gorgeous golden crust and that unmistakable homemade flavor. 🍞✨
