
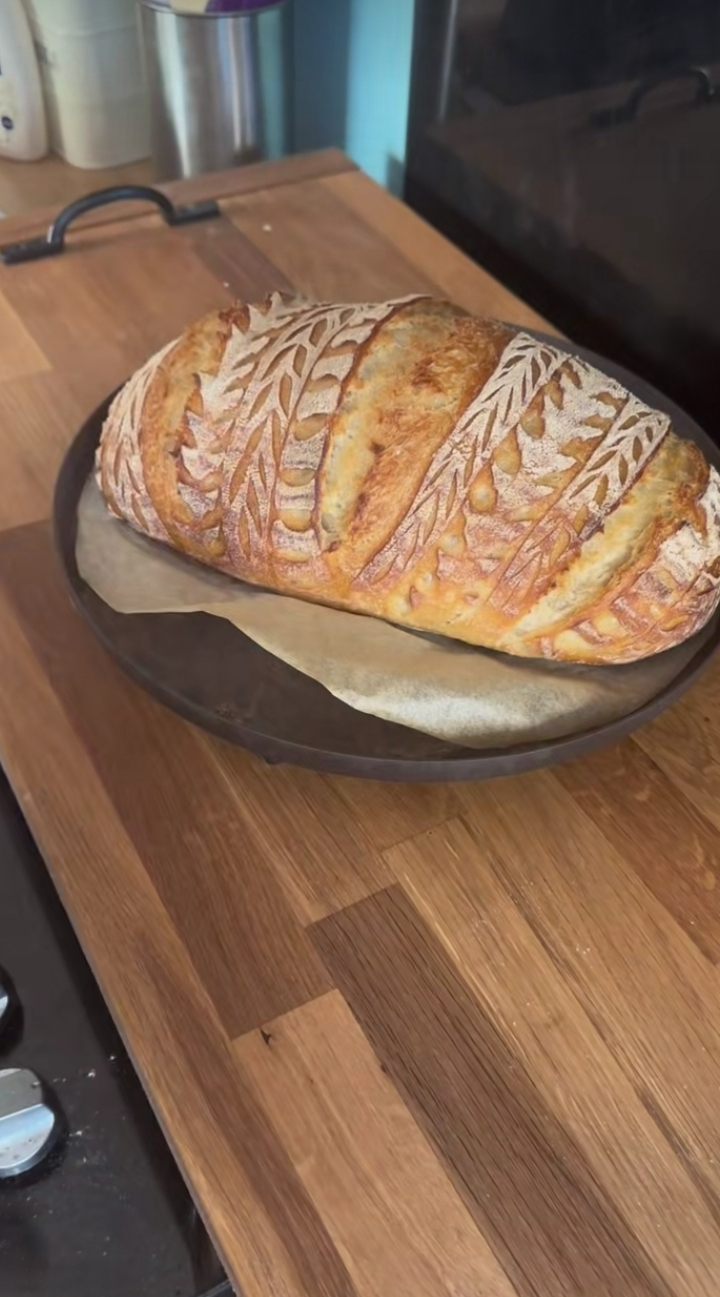
There’s something truly special about baking a beautiful loaf of sourdough bread at home. The crackling crust, soft chewy crumb, and stunning decorative scoring make this artisan sourdough loaf both delicious and impressive. The bread in the image features elegant leaf-pattern scoring that transforms a simple loaf into a work of edible art. Whether you’re an experienced sourdough baker or just beginning your journey, this recipe will help you create a bakery-style loaf with incredible flavor and texture.
Why You’ll Love This Recipe
- Crispy golden crust
- Soft and airy interior
- Naturally fermented flavor
- Beautiful decorative scoring
- No commercial yeast required
- Perfect for sandwiches, toast, or serving alongside meals
Ingredients
For the Dough
- 500g bread flour
- 350g water (room temperature)
- 100g active sourdough starter
- 10g salt
Optional
- Rice flour for dusting
- Extra flour for shaping
Equipment Needed
- Large mixing bowl
- Dough scraper
- Banneton basket or bowl lined with a towel
- Sharp bread lame or razor blade
- Dutch oven with lid
- Kitchen scale
Step 1: Feed Your Starter
A healthy sourdough starter is the foundation of great bread.
Feed your starter 4–8 hours before mixing the dough. It should be bubbly, active, and able to pass the float test. An active starter helps create excellent rise and flavor.
Step 2: Mix the Dough
In a large bowl:
- Add water.
- Mix in the active sourdough starter.
- Stir until mostly dissolved.
- Add bread flour.
- Mix until no dry flour remains.
The dough will appear shaggy and rough. That’s perfectly normal.
Cover and let rest for 30 minutes.
This resting period is called autolyse, which helps develop gluten naturally.
Step 3: Add Salt
Sprinkle the salt over the dough.
Wet your hands slightly and work the salt into the dough by folding and squeezing until fully incorporated.
Cover and rest for another 30 minutes.
Step 4: Stretch and Fold
Perform a series of stretch-and-folds to strengthen the dough.
First Fold
- Grab one side of the dough.
- Stretch upward.
- Fold over the center.
- Rotate the bowl.
- Repeat four times.
Cover and rest for 30 minutes.
Repeat
Perform a total of 4 sets of stretch-and-folds, spaced 30 minutes apart.
You’ll notice the dough becoming smoother, stronger, and more elastic after each set.
Step 5: Bulk Fermentation
Cover the dough and allow it to ferment at room temperature.
Depending on temperature, this can take:
- 4–6 hours at 75°F (24°C)
- Longer in cooler environments
The dough should:
- Increase noticeably in size
- Feel airy
- Show bubbles throughout
Avoid rushing this stage because fermentation creates flavor and structure.
Step 6: Pre-Shape the Dough
Lightly flour your work surface.
Gently turn out the dough and shape it into a loose round.
Allow it to rest uncovered for 20 minutes.
This rest relaxes the gluten and makes final shaping easier.
Step 7: Final Shaping
Shape the dough into a batard (oval loaf), similar to the loaf shown in the image.
To shape:
- Fold the top third toward the center.
- Fold the sides inward.
- Roll tightly from top to bottom.
- Create surface tension by pulling the dough gently toward you.
The dough should feel firm and hold its shape.
Step 8: Prepare for Proofing
Dust your banneton basket generously with rice flour.
Place the dough seam-side up into the basket.
Cover with plastic wrap or a reusable cover.
Step 9: Cold Proof Overnight
Transfer the dough to the refrigerator.
Allow it to proof for:
- 12–18 hours
Cold fermentation develops a richer flavor and makes decorative scoring easier.
Step 10: Preheat the Oven
Place your Dutch oven inside the oven.
Preheat to:
475°F (245°C)
Allow the Dutch oven to heat for at least 45 minutes.
A fully heated Dutch oven creates excellent oven spring.
Step 11: Decorative Scoring
Carefully remove the dough from the refrigerator.
Turn it onto parchment paper.
Dust lightly with flour.
Using a bread lame or razor blade, create decorative leaf patterns like the loaf shown in the image.
Tips for Beautiful Scoring
- Hold the blade at a slight angle.
- Make confident cuts.
- Keep decorative cuts shallow.
- Make one deeper expansion score for oven spring.
The flour dusting helps highlight the design after baking.
Step 12: Bake
Transfer the dough into the hot Dutch oven.
Covered Bake
Bake for:
20 minutes at 475°F (245°C)
Uncovered Bake
Remove the lid and continue baking:
20–25 minutes
Bake until the crust becomes deep golden brown.
Internal temperature should reach approximately 208–210°F (98–99°C).
Step 13: Cool Completely
Place the loaf on a cooling rack.
Allow it to cool for at least 1 hour before slicing.
This is difficult but important. Cutting too soon can result in a gummy crumb.
Serving Suggestions
This artisan sourdough bread pairs beautifully with:
- Salted butter
- Olive oil and balsamic vinegar
- Soups and stews
- Cheese boards
- Avocado toast
- Sandwiches
- Breakfast spreads
Storage Tips
Room Temperature
Store in a bread bag or wrapped in a clean towel for up to 3 days.
Freezing
Slice and freeze in an airtight container for up to 3 months.
Toast directly from frozen when needed.
Expert Tips for Success
✔ Use an active starter
✔ Weigh ingredients for accuracy
✔ Don’t rush fermentation
✔ Cold proof overnight for best flavor
✔ Use rice flour for clear scoring designs
✔ Preheat the Dutch oven thoroughly
✔ Allow the loaf to cool completely before slicing
Final Thoughts
This Decorative Artisan Sourdough Bread is the perfect combination of beauty and flavor. The stunning leaf-pattern scoring creates a bakery-quality appearance, while the long fermentation develops a rich, tangy taste and airy texture. Whether you’re baking for family, friends, or simply enjoying the process of sourdough baking, this loaf is sure to impress. Once you pull this golden masterpiece from the oven, you’ll understand why homemade sourdough remains one of the most rewarding breads to bake. 🍞✨
