
Recipe
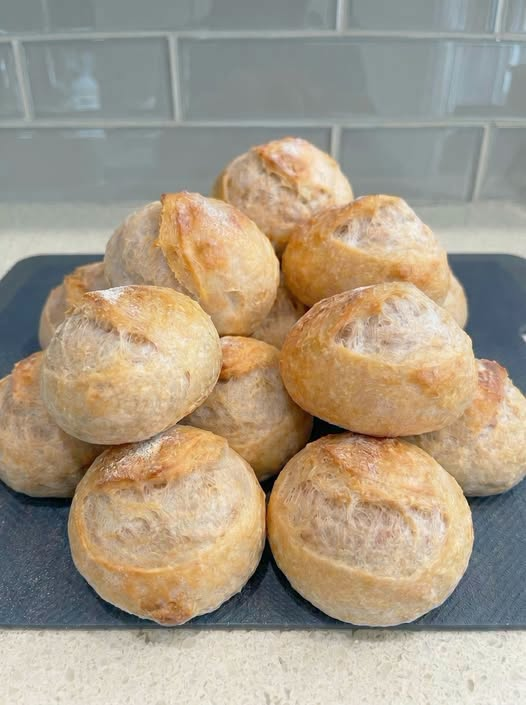
There’s something incredibly satisfying about pulling a tray of freshly baked bread rolls from the oven. The golden crust crackles as it cools, while the inside stays light, soft, and wonderfully airy. The bread rolls in the picture have a beautiful artisan appearance with a rustic golden finish, making them perfect for breakfast, lunch, dinner, or serving alongside soups and stews.
These homemade crusty bread rolls require only a handful of pantry ingredients, yet they deliver bakery-quality results. Whether you’re making sandwiches, dinner rolls, or simply enjoying them warm with butter, this recipe is easy enough for beginners and delicious enough to become a family favorite.
Why You’ll Love This Recipe
- Crispy golden crust
- Soft and fluffy interior
- Beginner-friendly recipe
- Uses simple pantry ingredients
- Perfect for sandwiches
- Great for freezing
- No special equipment required
- Better than store-bought rolls
Ingredients
For the Dough
- 500g bread flour
- 10g salt
- 7g instant yeast
- 350ml warm water
- 1 tablespoon olive oil
- 1 teaspoon sugar
Optional Toppings
- Melted butter
- Sesame seeds
- Poppy seeds
- Oats
- Flour for dusting
Kitchen Equipment
- Large mixing bowl
- Dough scraper
- Baking tray
- Kitchen towel
- Parchment paper
- Sharp knife or bread lame
- Oven
Instructions
Step 1: Mix the Dough
In a large bowl combine the bread flour, instant yeast, sugar, and salt. Mix well so the ingredients are evenly distributed.
Gradually pour in the warm water while stirring with a wooden spoon. Add the olive oil and continue mixing until a rough dough forms.
Step 2: Knead
Transfer the dough to a lightly floured surface.
Knead for about 10–12 minutes until smooth, soft, and elastic.
If using a stand mixer, knead on medium speed for about 8 minutes.
The dough should feel slightly tacky but not sticky.
Step 3: First Rise
Place the dough into a lightly oiled bowl.
Cover with plastic wrap or a damp towel.
Let it rise in a warm place for about 60–90 minutes until doubled in size.
Step 4: Divide
Punch down the dough gently.
Transfer it to your work surface.
Divide into 12 equal pieces.
Each piece should weigh approximately 70 grams.
Step 5: Shape
Take one piece of dough.
Fold the edges underneath several times to create surface tension.
Roll gently into a smooth ball.
Repeat with the remaining dough pieces.
Step 6: Second Rise
Place the rolls onto a parchment-lined baking tray.
Leave enough space between each roll.
Cover loosely with a towel.
Allow them to rise for another 35–45 minutes.
Step 7: Score
Dust each roll lightly with flour.
Using a sharp knife or bread lame, make one shallow cut across the top.
This helps the rolls expand beautifully while baking.
Step 8: Bake
Preheat your oven to 220°C (425°F).
Place a small oven-safe pan with hot water on the bottom rack to create steam.
Bake the rolls for 18–22 minutes until deep golden brown.
The bottoms should sound hollow when tapped.
Step 9: Cool
Transfer the bread rolls to a wire rack.
Allow them to cool for at least 20 minutes before slicing.
Tips for Perfect Bread Rolls
- Bread flour creates the best chewy texture.
- Don’t add too much extra flour while kneading.
- Steam in the oven helps create a crisp crust.
- Score the rolls just before baking.
- Allow the rolls to cool before cutting to keep the crumb soft.
- Use fresh yeast for the best rise.
- Measure ingredients accurately using a kitchen scale whenever possible.
Serving Ideas
These bread rolls taste amazing with:
- Butter and jam
- Garlic butter
- Homemade soup
- Beef stew
- Chicken salad
- Egg sandwiches
- Tuna sandwiches
- Breakfast bacon and eggs
- Grilled cheese
- Pulled chicken sandwiches
Storage
Store the cooled bread rolls in an airtight container at room temperature for up to 3 days.
To refresh, warm them in a 180°C (350°F) oven for 5–7 minutes.
Freezing Instructions
Allow the rolls to cool completely.
Place them in freezer-safe bags.
Freeze for up to 3 months.
Thaw at room temperature and warm in the oven before serving.
Variations
Garlic Butter Rolls
Brush warm rolls with melted garlic butter and parsley.
Cheese Rolls
Add shredded cheddar or mozzarella inside each dough ball before shaping.
Herb Rolls
Mix dried oregano, rosemary, thyme, or Italian seasoning into the dough.
Whole Wheat Rolls
Replace half of the bread flour with whole wheat flour for a heartier flavor.
Seeded Rolls
Top with sesame seeds, sunflower seeds, pumpkin seeds, or mixed seeds before baking.
Common Mistakes to Avoid
- Using water that is too hot, which can kill the yeast.
- Adding too much flour, making the rolls dense.
- Skipping the second rise.
- Not creating steam in the oven.
- Baking at a low temperature.
- Cutting the rolls while they are still hot.
- Overproofing the dough, which can cause the rolls to collapse.
Frequently Asked Questions
Can I make the dough ahead of time?
Yes. After the first rise, refrigerate the dough overnight. Let it come to room temperature for about 30 minutes before shaping and baking.
Can I use all-purpose flour?
Yes, but bread flour produces a chewier texture and a better crust.
Why are my rolls dense?
Dense rolls are usually caused by under-kneading, too much flour, expired yeast, or insufficient rising time.
How do I know when they’re done?
The rolls should be a rich golden brown and sound hollow when tapped on the bottom. An internal temperature of about 93–96°C (200–205°F) also indicates they are fully baked.
Can I freeze baked rolls?
Absolutely. Once completely cooled, freeze them in an airtight freezer bag for up to three months. Reheat directly from thawed in the oven for the best texture.
Final Thoughts
These Golden Crust Crusty Bread Rolls are everything homemade bread should be—crisp on the outside, fluffy on the inside, and bursting with fresh-baked flavor. They pair beautifully with soups, salads, sandwiches, or simply a generous spread of butter. With simple ingredients and easy-to-follow steps, this recipe delivers bakery-style rolls that are sure to impress family and friends. Once you bake a batch, you’ll find yourself making them again and again because nothing compares to the aroma and taste of warm, homemade bread fresh from the oven.
