
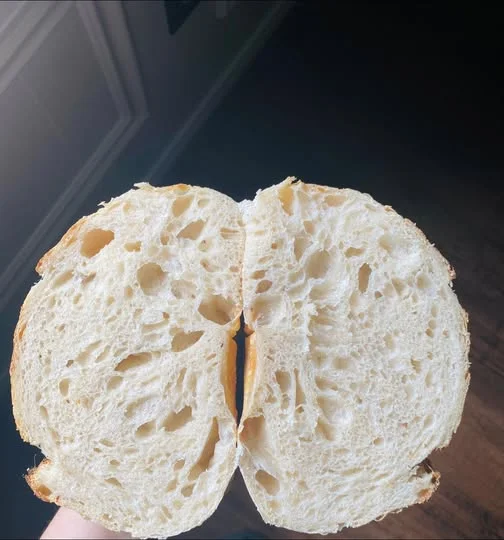
There’s something truly special about baking a loaf of artisan sourdough bread from scratch. The crackling crust, chewy crumb, and rich tangy flavor make every slice feel homemade and comforting. Unlike regular bread made with commercial yeast, sourdough uses a natural starter that slowly ferments the dough, creating deeper flavor and a beautiful texture. While sourdough baking may seem complicated at first, it is actually a rewarding process that requires only a few simple ingredients and a little patience.
This classic artisan sourdough bread recipe produces a loaf with a golden crust, airy interior, and delicious flavor that rivals bread from a professional bakery. Whether you’re new to sourdough or already maintain a starter, this recipe is perfect for everyday baking.
Why You’ll Love This Recipe
- Crispy artisan-style crust
- Soft and chewy crumb
- Naturally fermented flavor
- Made with only four ingredients
- Perfect for sandwiches and toast
- Beginner-friendly method
What Makes Sourdough Special?
Sourdough bread relies on a natural starter made from flour and water. The wild yeast and beneficial bacteria in the starter slowly ferment the dough, developing flavor and improving texture. This slow fermentation creates the signature tangy taste and open crumb that sourdough lovers enjoy.
Unlike quick breads, sourdough takes time to develop, but the result is a loaf with incredible depth of flavor and a rustic bakery-style appearance.
Ingredients
- 125g active sourdough starter
- 350g water
- 525g bread flour
- 10g salt
Equipment Needed
- Large mixing bowl
- Kitchen scale
- Dough scraper
- Banneton basket or towel-lined bowl
- Dutch oven
- Bread lame or sharp knife
- Cooling rack
Step 1: Mix the Dough
In a large bowl, combine the active sourdough starter and water. Stir until the starter is mostly dissolved. Add the flour and salt, then mix until no dry flour remains. The dough will look rough and shaggy, which is completely normal.
Cover the bowl and let the dough rest for 30 minutes. This resting period helps hydrate the flour and begins gluten development.
Step 2: Stretch and Fold
After resting, perform a set of stretch and folds. Wet your hands, grab one side of the dough, stretch it upward, and fold it over itself. Rotate the bowl and repeat on all four sides.
Repeat this process every 30 minutes for a total of 3–4 sets. Each set strengthens the dough without kneading and helps build structure.
Step 3: Bulk Fermentation
Cover the dough and allow it to ferment at room temperature for 4–6 hours, depending on the temperature of your kitchen.
The dough is ready when:
- It looks puffy
- Has increased by about 50–75%
- Shows small bubbles throughout
- Feels light and airy
Always watch the dough rather than relying only on the clock.
Step 4: Shape the Dough
Transfer the dough onto a lightly floured surface and gently shape it into a round. Let it rest for 15–20 minutes.
Perform a final shaping to create surface tension, then place the dough seam-side up into a floured banneton basket or bowl lined with a floured towel.
Step 5: Cold Proof Overnight
Cover the dough and refrigerate overnight for 12–18 hours.
Cold proofing improves flavor, strengthens the dough, enhances oven spring, and makes scoring easier before baking.
Step 6: Prepare for Baking
The next day, place your Dutch oven in the oven and preheat to 230°C (450°F) for at least 30–45 minutes.
Remove the dough from the refrigerator and carefully turn it onto parchment paper. Score the top with a sharp blade or bread lame.
Scoring controls how the loaf expands during baking and creates the classic artisan look.
Step 7: Bake the Bread
Transfer the dough into the hot Dutch oven and cover with the lid.
Bake:
- 20 minutes covered
- 20–25 minutes uncovered
The loaf should become deep golden brown with a beautifully crisp crust.
Step 8: Cool Completely
Remove the bread from the Dutch oven and place it on a cooling rack.
Allow it to cool for at least one hour before slicing. This helps the crumb finish setting and prevents a gummy texture.
Tips for Success
- Use a healthy, active starter
- Don’t rush fermentation
- Always preheat the Dutch oven thoroughly
- Allow the loaf to cool completely
- Practice patience for the best flavor
Serving Ideas
This artisan sourdough bread is delicious:
- Toasted with butter and jam
- Served with soups and stews
- Used for sandwiches
- Paired with olive oil and balsamic vinegar
- Added to a cheese board
- Made into homemade croutons
Storage
Store the bread at room temperature in a bread bag or wrapped in a clean kitchen towel for up to three days.
For longer storage, slice and freeze the loaf. Frozen slices can be toasted directly from the freezer whenever needed.
Final Thoughts
Classic Artisan Sourdough Bread is one of the most rewarding breads you can bake at home. With its crisp crust, airy crumb, and rich fermented flavor, every slice showcases the beauty of traditional bread making. While the process requires time and patience, the result is a stunning bakery-style loaf that is well worth the effort. Once you master this recipe, you’ll have a reliable sourdough bread that can be enjoyed with almost any meal.
🍞✨
